
My earring collection has grown exponentially since I discovered the sale rack at Forever 21 and I woke up this morning with a sudden urge to organize my treasures. I have seen other bloggers use picture frames as earring holders so this morning I busted out my rusty mad crafting skills and made this:
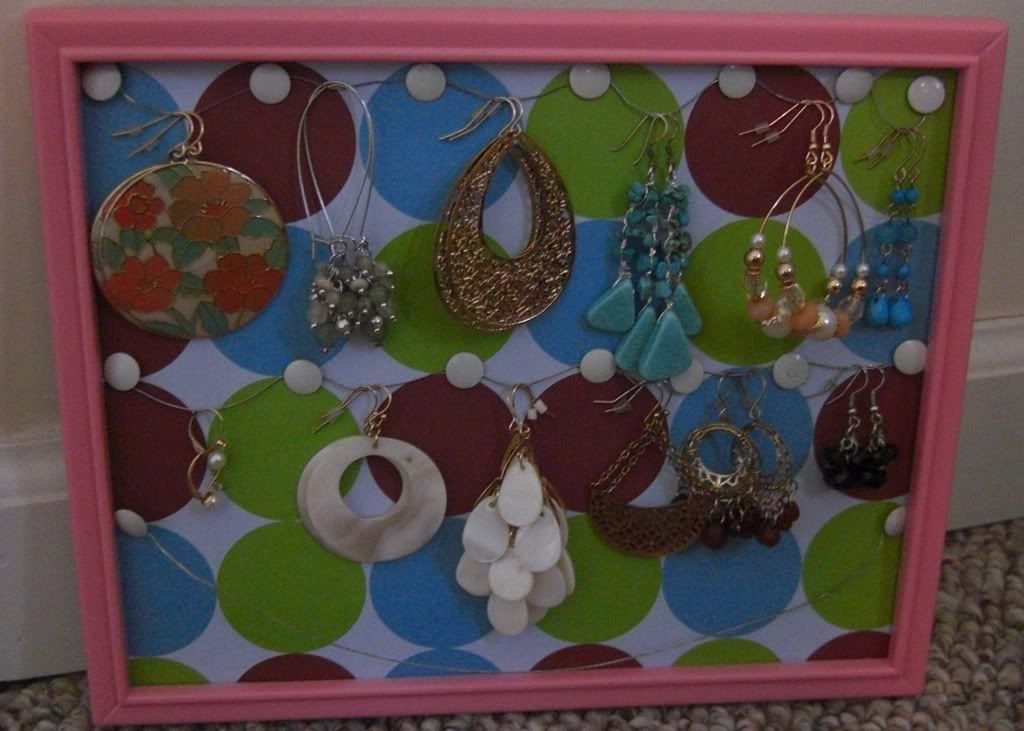
It's not the prettiest picture frame earring holder, but it will get the job done. Just in case anyone is interested, a quick tutorial is below.
You will need:
Pretty paper (I used scrapbook paper, but wrapping paper or wallpaper scraps would work too)
A cheap picture frame with a cardboard back (or a cardboard back that you cut to size yourself)
Scissors/Paper Cutter
A writing utensil (pencil is probably best)
Thumb tacks
Wire/string
1. Take the back off the picture frame and position it (or the stock photo that comes in it) over the design that you want to be visible in the picture frame. Use a pencil and lightly trace the outline of the picture frame back onto your pretty paper. Don't worry. You shouldn't be able to see the marks once your paper is in the frame even if you make them really dark.
2. Take a pair of scissors and cut along the line you just traced. You should end up with a piece of paper that will fit perfectly into your frame.
3. Put the piece of paper you cut out into your picture frame with the cardboard back the way you would a picture.
4. Now cut a piece of wire/string that is slightly longer than your picture frame is wide. Example: if your picture frame is 11 inches wide, your string should be about 11.5 inches long. Don't run off to find a ruler or anything. It doesn't need to be exact. Do you have your string? Awesome.
5. Tie one end of your string/wire around the pointy part of your thumbtack. Make sure that it's knotted well enough that it will stay on the end of the thumb tack. I used wire so I wrapped my wire around the end of the thumb tack several times tightly and it seemed pretty well attached. Got that done? Now you're going to tie the other end of your string around another thumbtack.
6. Press one of the two thumbtacks from step 5 through one corner of the pretty paper and as far into the cardboard back of the picture frame as it will go. If your cardboard is thin be careful because the thumbtack may poke all the way through and you don't want to prick your fingers.
7. Now take the other thumb tack and stretch it across to the opposite side of the frame. There should be at least enough string/wire between the two thumbtacks to reach all the way across. Press the second thumbtack into the opposite corner.
8. Lather rinse and repeat. This isn't a hair tutorial you say? Haha, well in that case repeat steps 4-7 except instead of pressing the tacks into the corners, you're going to start the next row of tacks an inch or two below the first set depending on how dangly your earrings are. I used a letter size picture frame and was able to fit 3 rows of wire on my frame (the third row doesn't have anything on it yet. Guess this means it's time to visit F21 again.)
9. Optional: When I hung my earrings on the wire I found that some of them wanted to slide down the wire and congregate in the middle. I wanted to keep the pairs separated so I used additional thumb tacks to hold up my excess wire and keep each pair of earrings in its own personal space. Also, I found that my thumbtacks poked all the way through my cardboard and in order to avoid finger sticking casualties I took a pair of pliers and gently bent the pointy ends down so that they were less hazardous.
Anyway, I know this is in no way a perfect tutorial, but I thought I would share. Next up, I need to find a way to organize my bracelets and necklaces...

My Fashion Confession by Ashley is licensed under a Creative Commons Attribution-NonCommercial-NoDerivs 3.0 Unported License.
No comments:
Post a Comment